
Part Five - Wires, Straps and Closure
This is the last post for this particular pattern! These last few things not hard at all - if you've made it through the elastic and the channeling, this is a little bit easier.
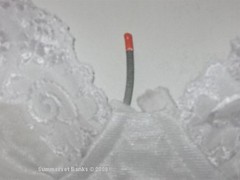
Let's start with the wires. Insert the wires into the channels so that the white end of the wire is at the underarm and the end with the colored sparkles is at the center. In some cases, it will seem like the wire is a bit too long - do not worry, just shove it in. In the most careful way, of course. When you start to wear the final product the cups and channeling will stretch a bit and everything will fit just fine. I will have to say that I made the smallest pattern size available, a 32A and I did not have wires this small. I was able to steal wires from another bra my daughter had that was going to be retired anyway.
 Once the wires are in, bar tack across the ends of the channeling on the bridge to close the channels. If this is only for a try on - you don't have to close the channeling. It will be just one less thing to rip out if you need to.
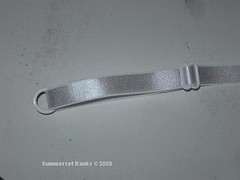
The next thing to make is the straps. The straps must be put on before the closure in this style. You will need to assemble the straps first. This can be a bit tricky, but I hope this series of photos will help.
1. Thread the strapping through a slider leaving a tail about 3/4".

2. Stitch down the tail so that the slider can not come off.
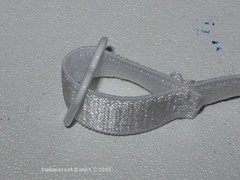
3. Thread the free end of the strap through a ring.
4. Bring the free end of the strap around to the left, toward the slider.
5. Thread the free end of the strap through the slider again and pull tight.

That's it, the strap is ready to be attached.
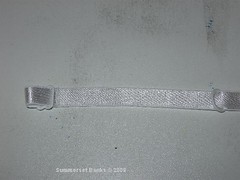
Take the ring and insert that little bit of elastic that you left at the top of the cup through it, bringing the elastic to the back.

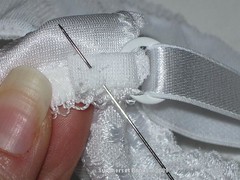 Bar tack the elastic in place. If this is only for a try on - just stitch across the elastic a few times, you can even leave the tails of the thread so you can find it and clip it out if necessary.
Bring the strap around to the back of the bra and line up the edge of the strap with the last unfinished edge of the back.

You can see this better from the wrong side:
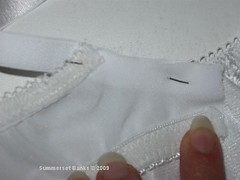
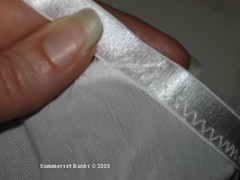
Zigzag close to the edge of strap to attach it, then bar tack at the elastic. This is a stress point, so it is a good idea to make it secure.
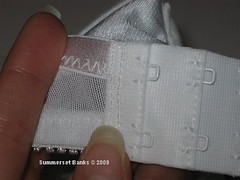
The final step is to add your closure. Check to see if the closure is the same width as the back. You might have to trim each section of the closure to fit. From the back, the hooks go on the section to your left. One end of the eyes opens up - just slip that over the raw edge of the back, with the fuzzy side (the side toward your body when wearing) down. The hooks go on the side to your right. Fold them in half, with the hooks facing down and attach like the eye section.

You can then either zigzag, satin stitch or baste it in place. If you're basting, use a regular stitch length. You don't want this coming loose during a try on.
You're done!

As a side note: I was not sure of the fit of this size for my daughter, but when she said that the other cups were not covering as much any more and the bands were too tight, I was pretty sure this would work. Once she tried it on and we adjusted the back and straps properly it fit right, she said it was comfortable. She did a wear test all day today and said it was "Wonderful." It fits just like the old ones, but just a bigger size.
Great tutorial. Unfortunately I never finished my bra-making class. This post is very helpful.
ReplyDeleteI have a question about underwires on any bra. This question may have been addressed before, I'm not sure. It's actually more of a fix question for most any bra. It seems that no matter which bra it is, the underwire always ends up poking through the fabric and into my skin. It's mostly the underarm side of the underwire that does this but sometimes I find the center doing it also. Is there a good fix for this to make my bras go that extra mile?
ReplyDelete