
Part One: Trace, Cut and Assemble Cups
This tutorial is for Elan 511. Elan 511 has a partial, this tutorial can also apply to other partial band patterns. If you have read the Elan 645 tutorial, you'll notice that some of the instructions are the same - that's because some of the same things apply, especially to the cutting out process. The sample shown in this tutorial will be a 32A, it seems that Elan 645 fit my daughter well in this size, so I am hoping for the same with this pattern.
Once you have your pattern and have found your size - this pattern includes the measuring instructions - find the pieces and trace them. You will need to trace off the pattern pieces - do not cut them out of the tissue! You or whoever you are making this for may change in size and you might need those other sizes some day. The seam allowances are already included in the pattern pieces, so all you have to do is trace. I just trace onto white tissue paper, the kind you'd use in gifts and gift bags. It is very easy to get and cheap. Make sure you mark all the dots, notches, direction of greatest stretch, and note the pattern number and size.
Once you have your pattern pieces, you can then cut out the fabric. To cut out the pieces, first check the pattern pieces for the greatest direction of stretch - this is similar to a grain line in a woven. Similarly, strange things happen if you don't follow the correct line - things will stretch that you don't want to stretch and stretchy parts won't stretch at all!
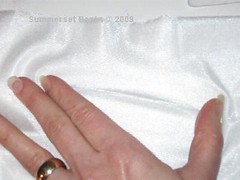
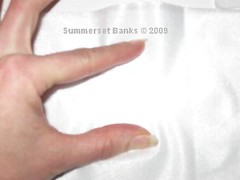
Now, find the direction of greatest stretch on the tricot. The tricot is a one way stretch fabric, meaning that it will stretch in one direction but not in the other. The power net is a 4 way stretch, meaning that it stretches in practically any direction. In the first photo, the fabric stretches in the horizontal direction, but not in the vertical as you see in the second photo.
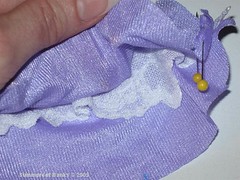
 Following the direction of greatest stretch or grain lines on the pattern pieces, pin and cut. You may prefer to rotary cut the pieces, that's fine. I actually prefer to use scissors - all the time, except for the rectangular bridge piece which is easily to cut with a rotary cutter.
You can use the power net for the back bands, as you've probably seen in RTW. You can use it layered with the tricot for back bands and lower cups, and you can use it under lace for a little more stability. If you're making a smaller size, you might not need as much structure, but it can be a good idea for the larger sizes. Take a look at RTW, just to get an idea of what fabric they are using in what places.
As a general rule, I cut two of the upper cups of the lace and the two of either powernet or tricot depending on the strength of the lace and whether I want a little sheerness. I cut 4 of the lower cup, and I'll show you how I use those to line the lower cup and hid the seam allowance in another post. I cut two of the back band in either powernet or tricot and the rectangle for the bridge in tricot.
The last thing you'll need to cut is the lace. As a side note regarding this particular pattern, the first two of these I've made, both in different sizes, I noticed that there was not as much coverage in the upper cup at the armhole side. Since this will be the third time sewing this pattern for me, I've add a little extra at the armhole side - this is now more like Elan 645. The new line is on the left and the original on the right - just a little extra triangle of fabric is all that is needed.

Place the upper edge of the pattern piece along the scalloped edge of the lace and cut out one side. Flip the pattern piece over to cut out the lace for the other side, aligning the pattern piece to have as close to a mirror image as you can get.
Once you have your pieces cut out, you are *almost* ready to begin sewing.
Before you begin, make sure you have the proper needle in your machine - one that will be able to sew stretch fabrics. This type of needle is different for every machine, but generally a stretch needle is the right one. You will be stitching a lot of elastic and stretch fabrics and the wrong needle will cause frustration every time. It is such a simple thing to fix, too!
The strange thing about bras is that unlike many other garments that can be fitted along the way, these garments can not. You just about have to have a completed garment before trying it on. Careful measurements help, but since every body is unique, you may have to adjust along the way. What I suggest doing, is doing what we do in regular garment sewing: baste! You can machine baste with a longer stitch before committing to permanently sewing the pieces together. You can also attach the elastics with a wide and long zigzag before making a commitment. It will be much easier to remove the stitching and adjust something rather than picking out little bitty stitches. Trust me, I've picked apart quite a few bras and it's no fun. As we progress, I'll show you both ways of stitching.
Cups:
To begin assembly, you will need to consider the top edge finish. If you are just using stretch lace for the upper cup, then you have no finishing to do. If you are using the stretch lace over another fabric, you will need to attach the two fabrics together. To see how this is done, please check out this tutorial from Elan 645.
Now, matching the symbols and notches, stitch the lower and upper cups together. I like to line the bottom cups - this is why I cut out four of them - which also helps to hide the seam allowances and make the inside of the cups smooth. To do so, I place the upper and lower cups right sides together and then place the remaining lower cup piece face down, right sides together *with the other lower cup*. You can see lace sandwiched in between in the photo below.
Don't be afraid to use a lot of pins. These fabrics can be slippery and your seam allowance is only 1/4". Make sure everything is lined up properly.
I stitch my seams with a 2.6 stitch length for a permanent seam. If you're basting, use something larger, like 4.0 length. This is big enough to be easily removed, but small enough to hold the pieces together properly. Once the seam is stitched, the cups can be opened and pressed.
 The cups are now ready for the next step: the bridge and bottom band. That's the next tutorial.
No comments:
Post a Comment